Posts

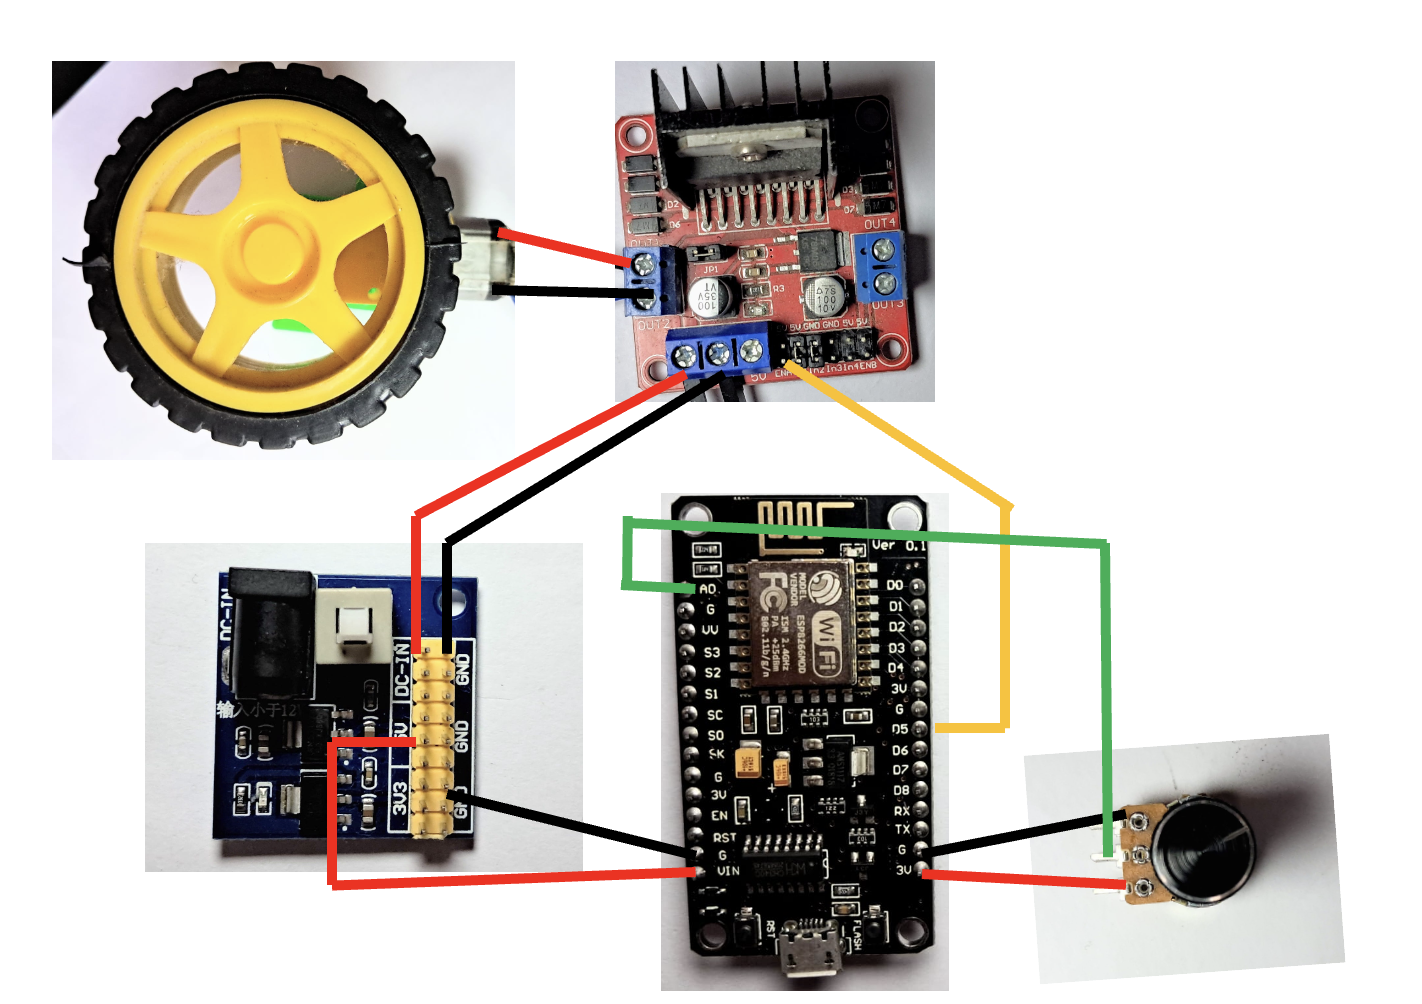
Microphone Sound Sensor explained | HW-484 | Interfacing with ESP 8266

Image
 Microphone Sound Sensor In this tutorial, we will learn about microphone sound sensor which is used to measure sound intensity. The sensor takes in ambient sound and provides a voltage corresponding to intensity in both digital and analog outputs. We will see both cases of outputs. Case 1 : Using Digital Output In this we will try to lit an Led if the voltage output is above a threshold. Parts Needed 1. ESP 8266 NodeMCU 2. 330 Ohms resistor 4. HW 484 Sensor 5. Power supply 3.3v/5v 6. Led  7. Jumper wires and bread board Connections Power supply 3.3V - HW484 + Power supply Gnd - HW484 G NodeMCU D4 - HW484 D0 NodeMCU D2 - 330 Ohms Resistor - Led CODE boolean soundValue = 0 ; void setup ( ) {   pinMode ( D2 , OUTPUT ) ;   pinMode ( D4 , INPUT ) ;   Serial . begin ( 115200 ) ; } void loop ( ) {   soundValue = digitalRead ( D4 ) ;   Serial . println ( soundValue ) ;   if ( soundValue == HIGH ) {     di...

[Experiment] Automatic watering machine for home garden triggered by whatsapp message

Image
Automatic Watering Machine using ESP for home garden during Vacations In this tutorial, we will build a low cost watering machine that can water home garden plants daily upon a message on whatsapp. In the past every time i go on a vacation all my plants use to die and i had to get new plants from nursery. Hopefully this device should keep my plants alive while i am away.  Parts needed Watering Machine 1. ESP 01 2. One Channel Relay 3. Power module 4. Jumper wires 5. Male and Female DC connectors 6. DC diaphragm Water pump Plumbing 1. Butterfly hose connectors for input and output pipes 2. 6mm pipe 3. Transparent 6mm water pipe as inlet 4. 10mm water pipe (blue color) as outlet. 5. 10mm to 6mm elbow connector (Connects outlet and 6mm pipe) 6. Arrow stakes (to secure pipe above roots) 7. Nozzle heads (control water flow for each plant) 8. 6mm elbow and tee push fit connectors    Complete plumbing as shown in above video. Hardware connections ESP 01 3.3V to Power module 3.3V...

Controlling Speed of a motor | Pulse Width Modulation on ESP 8266 | L298N motor driver

Image
 Pulse Width Modulation PWM on ESP8266 In this tutorial we will learn about pulse width modulation (PWM). PWM is used to turn on and off a device at a rapid pace to stimulate decrease voltage and reduce power intake. In this case, we will drive a motor at reduce speeds. The width of the pulse will determine the amount of time the power needs to be on for the device. Hence the name Pulse Width Modulation. Components Needed 1. BO motor and wheel 2. NodeMCU 3. Power supply to power L298N motor driver 4. Potentiometer 10K 5. Jumper wires Connections Power Module          L298N Driver          ESP          Potentiometer          BO Motor          12V                              12V               Gnd           ...

Controlling WS2812b Leds with ESP8266 | FastLed | Sliding Pot

Image
Interfacing WS2812b with esp8266 using FastLed In this experiment we will learn about WS2812b leds and try to control them using a siding potentiometer.  Each led in the strip as a unique address allowing for individual control and can display wide range of colours including RGB and white with varying brightness. The strip works at 5V and consumes 50mA per led.It has a data transfer rate of 800Kbps. It requires only one data pin from micro controller making it versatile and easy plugin to projects.  We will use FastLed library for controlling the led strip. Now lets talk about siding potentiometer.  This is a 10K ohm resistor pot with a sliding knob to control resistance. It works on 3.3v and 5v and outputs a voltage between Gnd and Vcc which can be treated as a analog signal. This signal can then be fed to ADC for digital conversion. We will connect  output terminal to ESP A0 pin to extract digital value and use it to control number of leds. Circuit Diagram Connecti...

Water Level/Depth sensor | ESP8266 | NodeMCU

Image
Water Level Sensor interfacing with ESP8266 In this tutorial, we will discus about water level sensor and determine how to connect it to a ESP 8266 for measuring water level in a jar. Water flow sensor contains traces arranged side by side intervened. These are power and sense traces.  It has 3 terminals. S + and -. S provides an analog signal which can be connected to ADC pin in a  micro controller and use the readings to measure threshold. When this sensor is immersed in water containing minerals, when sensor is powered the power traces becomes conductive. The more the sensor is in water the less resistance it will have. You can think of the sensor as a potentiometer.  When sensor is dry the resistance is maximum.  Now lets test calibrate this sensor in a jar.  Connections ESP8266                    Water level sensor     A0                  ...

[Experiment] DIY Robotic 2 wheel drive car using L298N motor driver and NodeMCU | ESP 8266

Image
 DIY 2 Wheel drive robotic car In this experiment we will learn building 2 wheel drive robotic car using 2wd kit and L298N motor driver. We will use Websockets to control this car from mobile browser.  Lets first start building the car. Components needed 1. 2WD car kit     a. Chassis     b. 2 BO motor with soldered wires     c. 2 BO Wheels     d. Screws, nuts and spacers     e. Mounting accessories     f. 12V Battery pack. You can use battery pack provided by kit     g. Front ball wheel 2. L298N motor driver 3. Jumper wires, DC female jack adaptor wire. 4. NodeMCU Connections NodeMCU     L298N driver           D2                         IN1                D5                         ...