Load Cell for measuring weights | HX711 ACD | Interfacing with ESP 8266 | NodeMCU
Interfacing Load cell with ESP 8266 for measuring weights
In the world of measuring weights, lets understand about an unsung hero capable of measuring with accuracy close to milligrams. We are talking about Load Cell. There are many kinds of load cell, we will try to understand compression based load cell that is used to measure downward force.

Load cell in this case is a rectangular metal rod with strain gauges attached as shown in the above diagram. Strain gauges detects the deformity in the metal rod and sens a weak signal which has voltage difference proportional to deformity. This signal is then fed to a amplifier, in this case HX711 analog to digital converter which can then be processed by micro controller.
Detailed video on load cell below.
Load cell has 4 wires. Red and black are for power supply to strain gauges and white and green are output. These wire are thin so i have soldered them to HX711 board input.
RED -> E+Black -> E-White -> A-Green -> A+

In this tutorial i am using 1kg load cell. The arrow indicates the direction of force where object should be placed for measurement.

Parts Needed
1. Load Cell
2. Measuring plate and base plate
3. Spacers
4. Nuts and screws
5. HXT 711 ADC board
6. NodeMCU
7. Jumper wires
Circuit Diagram

Load Cell strain guage wires to HXT711.
HX711 Vcc to NodeMCU 3v
HX711 Gnd to NodeMCU G
HX711 DT to NodeMCU D4
HX711 SCK to NodeMCU RX
Library
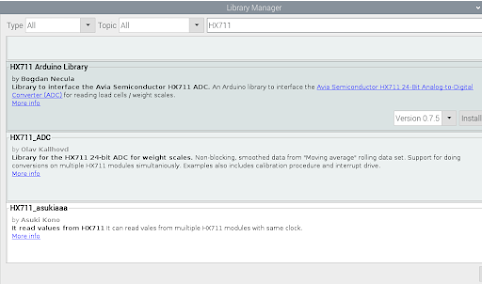
We will use HX711 Arduino Library. Go to Sketch -> Include Library -> Manage Libraries. Search for HX711. Install the above
For the first time we will have to calibrate the load cell.
We will first see calibration followed by measuring weights of objects.
Take a known weight (I measured an object by kitchen scale.)

Calibration Code
#include "HX711.h"

// HX711 circuit wiring
const int LOADCELL_DOUT_PIN = 2;
const int LOADCELL_SCK_PIN = 3;

HX711 scale;

void setup() {
  Serial.begin(57600);
  scale.begin(LOADCELL_DOUT_PIN, LOADCELL_SCK_PIN);
  delay(2000);
}

void loop() {

  if (scale.is_ready()) {
    scale.set_scale();
    Serial.println("Tare initiated. Remove all items from measuring plate.");
    delay(2000);
    scale.tare();
    Serial.println("Tare done.");
    Serial.println("Place a known weight on measuring plate");
    delay(5000);
    long reading = scale.get_units(10);
    Serial.print("Result: ");
    Serial.println(reading);
  } else {
    Serial.println("HX711 not found.");
  }
  delay(2000);
}
After placing same object on measuring plate. Result was 128182.
Calibration Factor = Result / Known Weight = 128182/117 = 1095.572
Measuring Code.
Let modify the example sketch to fit the calibration result. Line 48 is changed.

File -> Examples -> HX711 Arduino Library -> HX711_full_example
/**
 *
 * HX711 library for Arduino - example file
 * https://github.com/bogde/HX711
 *
 * MIT License
 * (c) 2018 Bogdan Necula
 *
**/
#include "HX711.h"


// HX711 circuit wiring
const int LOADCELL_DOUT_PIN = 2;
const int LOADCELL_SCK_PIN = 3;


HX711 scale;

void setup() {
  Serial.begin(38400);
  Serial.println("HX711 Demo");

  Serial.println("Initializing the scale");

  // Initialize library with data output pin, clock input pin and gain factor.
  // Channel selection is made by passing the appropriate gain:
  // - With a gain factor of 64 or 128, channel A is selected
  // - With a gain factor of 32, channel B is selected
  // By omitting the gain factor parameter, the library
  // default "128" (Channel A) is used here.
  scale.begin(LOADCELL_DOUT_PIN, LOADCELL_SCK_PIN);

  Serial.println("Before setting up the scale:");
  Serial.print("read: \t\t");
  Serial.println(scale.read());			// print a raw reading from the ADC

  Serial.print("read average: \t\t");
  Serial.println(scale.read_average(20));  	// print the average of 20 readings from the ADC

  Serial.print("get value: \t\t");
  Serial.println(scale.get_value(5));		// print the average of 5 readings from the ADC minus the tare weight (not set yet)

  Serial.print("get units: \t\t");
  Serial.println(scale.get_units(5), 1);	// print the average of 5 readings from the ADC minus tare weight (not set) divided
						// by the SCALE parameter (not set yet)

  scale.set_scale(1095.572);                      // this value is obtained by calibrating the scale with known weights;
  scale.tare();				        // reset the scale to 0

  Serial.println("After setting up the scale:");

  Serial.print("read: \t\t");
  Serial.println(scale.read());                 // print a raw reading from the ADC

  Serial.print("read average: \t\t");
  Serial.println(scale.read_average(20));       // print the average of 20 readings from the ADC

  Serial.print("get value: \t\t");
  Serial.println(scale.get_value(5));		// print the average of 5 readings from the ADC minus the tare weight, set with tare()

  Serial.print("get units: \t\t");
  Serial.println(scale.get_units(5), 1);        // print the average of 5 readings from the ADC minus tare weight, divided
						// by the SCALE parameter set with set_scale

  Serial.println("Readings:");
}

void loop() {
  Serial.print("one reading:\t");
  Serial.print(scale.get_units(), 1);
  Serial.print("\t| average:\t");
  Serial.println(scale.get_units(10), 1);

  scale.power_down();			        // put the ADC in sleep mode
  delay(5000);
  scale.power_up();
}
Upload the code and now lets measure.
See output from serial monitor. Please check the baud rate.

Example has a baud rate of 38400
Output is 68.2 grams.

Now lets measure the same of kitchen scale to verify.
Troubleshooting
1. Serial monitor baud rate should be as in code.2. Connections between load cell and amplifier are not proper.3. Pins to connect amplifier and esp are causing noise.


Comments
Post a Comment